Recipe
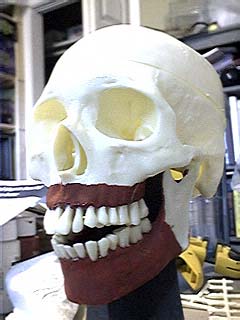
Let me start by saying this takes a huge amount of man hours. That being said; it is also a lot of fun. I called all over the U.S. looking for the human skull models for these and there was 2 left in a warehouse so I bought them. I’m not going to go into to much detail here but you should buy the book put out by DiStefano called “How to build a corpse”. This is a great introductory book on the topic and is a place to start. There are a lot of things I did differently; for example I changed the shape of the wooden frame, I use Great Stuff foam to build-up and carve shapes under the cotton and latex. Oh just buy the book!
 The gums are painted a deep red to highlight the teeth.
 The teeth are very realistic. They are difficult to glue in properly but look better crooked I think.
 Here I’ve blued the latex on the underside of the chin and the cheeks.
 The skull cavity is filled with a “Great Stuff” brain.
 The neck post is attached with liquid nails and Great Stuff foam. The foam is now dry and is shown prior to the carving process.
 The Great Stuff is carved away creating the natural contour of the back of a persons neck.
 The first layer of cotton is applied using spray adhesive.
 I decided to use Great Stuff to build up the shoulders and figured I could carve the proper shape from it later before applying the cotton and latex.
 The first layer of cotton appears fairly thick but still shows a lot of the details.
 I used twisted nylons to create the tendons in the neck and some showed through and some didn’t… this adds to the realism.
 The first coat of latex has been applied… I’ll add one more coat and then start the detailing…
 I altered the frame slightly to give it a more human shape as opposed to a wooden frame. Here it is covered with burlap and given a first coat of latex.
 The first layer of detail has been added to the head. The brows, eyelids, nose, lips, ears and cheeks have been started. Another coat of latex will have to be applied to smooth out some of the fiberfill hairs.
 I added some decay today in the form of a head rotted gash and a split on the other side… some missing top lip and the eye socket goop. I’m going to add the base colour next as I like the look.
 I added the last layer of latex today. It has yellowed nicely. I just have to stain and add hair now… Stay tuned!
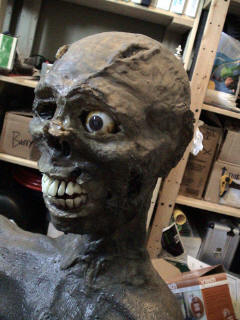
 I bit the bullet and painted the corpse today. I used a mix of brown latex paint and some black for colour, mixed with liquid latex.
 I was going for the unearthed, dirty corpse look.
 Hoping to have the packed in dirt for a while vibe happening.
Inspiration:
Comprehensive Corpsification Techniques – Gore-Galore
How to build a corpse – DiStefano Productions
Uncle Dirtnap – Primitive Pictures
Build a corpse – Twisted Visions